Ethan Cole

Use a wooden block to provide a sturdy base for your timepiece display. Cut a piece of wood to a size that comfortably accommodates your accessory while ensuring it remains stable. Sand the edges to avoid splinters and achieve a polished look.
Incorporate a hook or a small dowel onto the top of your wooden base. Drill a hole that fits snugly, ensuring the timepiece can rest securely without the risk of slipping. This feature allows for an upright presentation, enhancing visibility.
For a touch of personalization, paint or stain the holder to match your interior decor. Use non-toxic materials for a safe finishing. This not only adds aesthetics but also protects the wood from moisture and wear.
Lastly, consider adding felt pads to the bottom of the base. This prevents scratching surfaces and enhances stability. With these simple materials, you create a practical and attractive solution for displaying your timekeeping device.
Creating a Simple Holder for Your Timepiece
Select a sturdy material, such as wood or acrylic, to construct a base. Cut a rectangular piece approximately 6 inches by 4 inches. This will provide stability.

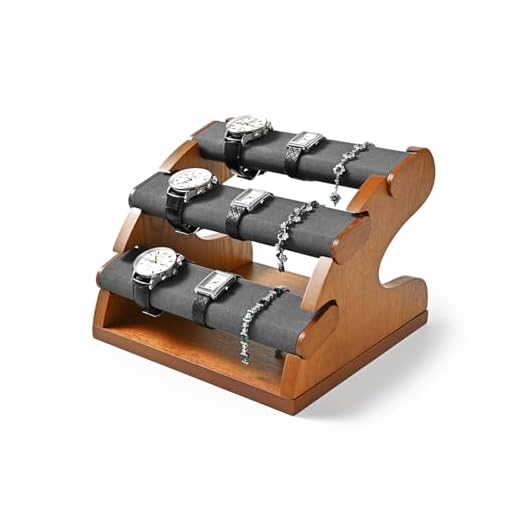
Next, choose a vertical support. A wooden dowel or a thick metal rod can work well. Cut it to a height of about 8-10 inches, depending on the size of your accessory.
Drill a hole in the center of the base where the support will be attached. Ensure the hole is slightly smaller than the diameter of the dowel or rod to keep it secure. Use wood glue or epoxy to fix the support into place.
To add an aesthetic touch, consider painting or finishing the base. This enhances appearance and protects the surface.
Finally, to prevent slipping, attach a small piece of rubber or felt at the bottom of the base to protect surfaces and provide traction.
Choosing the Right Materials for Your Watch Holder
Select materials based on durability and aesthetics. Wood, acrylic, and metal are popular choices. Each option offers unique benefits that cater to personal style and specific needs.
Wood
Wood provides a classic and warm look. Options include:
- Oak: Durable and resistant to wear.
- Walnut: Rich color and grain pattern enhance visual appeal.
- Pine: Affordable and easy to work with, especially for beginners.
Acrylic
Acrylic offers a modern touch. Consider its advantages:
- Lightweight: Easy to move and assemble.
- Transparent Options: Showcase the timepiece and create a sleek design.
- Customizable: Can be easily cut and shaped into various designs.
Choosing the right material enhances both function and style, ensuring a perfect display for your timepieces. Always factor in the environment where the holder will reside, as this affects material longevity and maintaining its appearance.
Step-by-Step Instructions for Building a Wooden Timepiece Base
Begin with selecting quality timber, such as oak or maple. These types provide durability and aesthetic appeal. Cut a rectangular piece measuring 8 x 4 inches for the base, ensuring the thickness is at least 1 inch for stability.
Next, create an upright section that will hold the timepiece. Cut a piece measuring 2 x 4 inches to a height of 5 inches. Sand all surfaces until smooth, removing any splinters and rough edges.
Secure the upright to the base using wood glue, applying pressure for a strong bond. For added strength, consider using small screws for reinforcement. Drill pilot holes to prevent splitting the wood.
Once the glue has dried, use wood stain or paint to finish the piece. Choose a color that complements your décor. Lightly sand between coats for a polished look, applying at least two layers for a rich finish.
Finally, ensure stability by attaching small rubber pads to the bottom of the base to prevent slipping. Allow everything to set completely before placing your timepiece on the new holder, ensuring a reliable and attractive storage solution.
Creating a Simple Timepiece Holder Using Cardboard
Utilize sturdy cardboard to craft an efficient holder. A piece measuring 30cm x 20cm serves as the base. Cut it into a rectangular shape for stability.
Required Materials
Gather the following supplies:
- Cardboard sheets
- Scissors or a craft knife
- Glue or tape
- Ruler
- Pencil
Detailed Steps for Assembly
1. Cut two identical strips measuring 5cm x 20cm for the sides. These will provide height.
2. Create a triangular support by cutting a piece that measures 10cm at the base and 10cm in height. This will strengthen the structure.
3. Attach the triangular piece to the back of the rectangular base using glue or tape;
4. Position the vertical strips on each side of the base for side support, sticking them down to the base and the triangular piece.
5. Once the glue is dry, test stability. The combined structure should securely hold items upright.
Customize your design by painting or adding decorative elements. Cardboard is flexible, allowing for personalization. This straightforward strategy effectively organizes your timepieces.
Design Ideas for Customized Timepiece Supports
Consider these distinctive concepts to personalize your timepiece holder:
1. Minimalist Concrete Base
Utilize concrete for a modern feel. Create geometric shapes for a sleek appearance. Mold a small slab with an increment in height for support. Add a soft finish to prevent scratches on your items.
2. Natural Wood Grain Accent
Use reclaimed wood to construct an eco-friendly look. Highlight the natural imperfections and grain patterns. Sand down the edges for a smoother touch, making each piece unique.
| Material | Effect |
|---|---|
| Concrete | Modern, durable, customizable |
| Wood | Warm, unique, rustic |
| Plastic | Versatile, lightweight, vibrant |
| Metal | Sleek, industrial, high-end |
Combine different materials for multi-textured designs. Consider using colorful paints for accent details that match your decor. Explore different sizing to create a set of holders that can be arranged creatively.
3. Fabric-Covered Base
Wrap a sturdy base with a soft fabric for a cozy look. Choose textiles that complement the environment. Upholstery fabric or felt can add a unique touch while providing protection from scratches.
Incorporate functionality by adding compartments for accessories. Consider designing elements that allow for easy access or display, suiting your personal style perfectly.
Tips for Painting and Finishing Your Display Unit
Select high-quality acrylic or enamel paint for a durable finish. These paints resist chipping and provide a smooth, even coat. For a glossy look, consider a polyurethane clear coat.
Prior to painting, sand the surface to create a rough texture, ensuring better adhesion. Dust off any residues with a damp cloth to prepare the surface.
Use painter’s tape to mask off areas that should remain unpainted. This will help achieve clean lines and a professional appearance.
Apply multiple thin layers instead of a single thick coat. Allow each layer to dry thoroughly; this prevents drips and ensures a uniform finish.
Experiment with different brush sizes to reach intricate areas. A foam brush can help with larger surfaces for a smooth application.
For an artistic touch, consider using stencils or techniques like sponging. These methods add uniqueness to your piece.
After painting, allow ample drying time before handling to prevent smudges or imperfections.
Finally, use a soft cloth to polish the finished product, enhancing the shine and overall appearance of your creation.
Maintaining and Storing Your Display Unit Effectively
Regular upkeep is key to prolonging the life of your holder. Clean it periodically with a microfiber cloth to remove dust and fingerprints. For wooden options, utilize a soft solvent-free cleaner to maintain the finish without damaging the surface.
Storage Guidelines
- Position in a dry environment to prevent moisture accumulation.
- Avoid direct sunlight to minimize fading or discoloration.
- Consider using silica gel packs to control humidity levels when stored.
- Rotate positioning occasionally to prevent imprints or indentations.
Preventive Measures
- Keep away from extreme temperatures, as they can warp or crack materials.
- Secure against accidental bumps by placing in a dedicated area free from heavy traffic.
- Utilize padded materials or sleeves when transporting for added protection.
Implement these practices to ensure your storage solution remains in excellent condition and serves its purpose for years to come.