
 Ethan Cole

Before you commence the reassembly process, ensure you have a clean workspace, adequate lighting, and the right tools on hand. A fine-tipped screwdriver, tweezers, and a case back opener will be indispensable for this task.
First, gently place the movement into the case, aligning it with the corresponding notches. Be cautious as you handle the delicate parts; avoid applying excessive force. Secure the movement using the screws provided, ensuring they are tightened evenly to prevent misalignment.


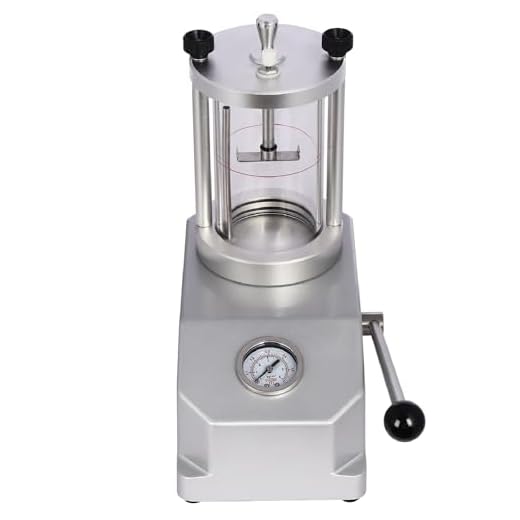
Next, carefully attach the face and hands. Utilize tweezers to maneuver the hands onto their respective posts. Ensure each hand is aligned properly; misalignment can affect the accuracy of timekeeping. Once satisfied, use a press to secure the glass or crystal back onto the case, ensuring a snug fit to protect the internal components.
Finally, check the function by winding the crown and observing the movement. If everything operates smoothly, your timepiece is successfully reassembled and ready for use. Regular maintenance can prolong its life and ensure optimal performance.
Gathering Necessary Tools for Assembly
Secure a reliable set of equipment before attempting reassembly. Key instruments include a precision screwdriver set, tweezers, a case opener, and a movement holder. Each tool plays a significant role in ensuring the process is smooth and damage-free.
| Tool | Description |
|---|---|
| Precision Screwdriver Set | Various sizes to fit unique screws found in timepieces. |
| Tweezers | For handling small parts securely without damaging them. |
| Case Opener | Designed to safely access the back of the casing. |
| Movement Holder | Keeps the mechanism stable during assembly. |
| Loupe or Magnifying Glass | For detailed inspection of components. |
| Grease | Aids in lubricating parts to ensure smooth function. |
| Soft Cloth | Prevents scratches during the handling of surfaces. |
Verify each item is in good condition. Quality tools minimize risks of errors during the merging of components.
Identifying and Organizing Watch Components
Begin with separation of components into distinct groups. Place the movement, case, dial, hands, and crystal in separate areas, clearly marked for easy access.
Utilize small containers or designated sections on a clean workspace to avoid mixing parts. Label each container: “movement,” “case components,” “dial elements,” and “strap.” This organization aids in swift identification during reassembly.
Examine each component carefully. Familiarize yourself with the movement type–automatic or quartz–understanding its parts, such as gears and springs, enhances overall knowledge. Separate the caseback screws if applicable, as these will differ based on design.
When handling the dial and hands, use fine tweezers to prevent damage. Keep these parts together within a protective casing to avoid bending or scratching. Ensure the crystal remains in its designated space, untouched by contaminants.
Note the direction of any screws or clips when removing components to ensure correct reinstallation. Keeping a visual reference or taking photos before disassembly can also assist in proper placement later on.
Reassembling the Movement Step-by-Step
Begin with the mainspring. Secure it into the barrel and ensure proper tension. Align the barrel with the movement baseplate, ensuring that the three or four locating pins fit precisely.
Installing the Gear Train
Position the gear train components systematically. Start with the center wheel, followed by the third wheel, and finally the fourth wheel. Each should seat snugly and rotate freely.
- Check for any misalignment or obstruction.
- Make adjustments to ensure smooth gear interaction.
Adding the Escapement and Balance Assembly
Carefully insert the escape wheel into its designated place. Connect the pallet fork to the escape wheel, ensuring the pallets engage correctly. Finally, place the balance wheel on its pivot.
- Test the assembly by giving the balance a slight spin; it should oscillate with a steady rhythm.
- Watch for the performance of the escapement during this test.
After confirming the gear train operates smoothly, proceed to install the balance bridge. Ensure that screws are tightened correctly to prevent movement during function.
Final Assembly Steps
Reattach the dial, carefully aligning it with the movement. Secure the hands, starting with the hour hand, followed by the minute hand and then the second hand. Make sure they do not interfere with one another.
- Check the alignment of all hands before securing.
- Test the winding and time-setting functions to ensure everything is operational.
Conclude the procedure by securing the case back. Inspect for any visible dust or fingerprints before sealing, and ensure water resistance by applying a new gasket if necessary.
Installing the Glass and Case Cover
Ensure a clean, dust-free workspace before beginning the assembly of your timepiece. A lint-free cloth can help maintain clarity when handling transparent components.
Preparing the Glass
- Inspect the glass for scratches or debris. Clean it with a microfiber cloth if necessary.
- Apply a slight amount of silicone grease around the edge of the glass. This will aid in proper sealing.
- Align the glass gently with the case, ensuring it fits snugly without any force. This reduces the risk of cracking.
Securing the Case Back
- Position the case back directly over the case. Make sure that any notches or alignment marks on both parts align correctly.
- Apply gentle pressure while evenly distributing force around the edges. Listen for a click indicating a secure fit.
- If your design requires screws, use a precision screwdriver to tighten them evenly, avoiding overtightening which might damage the casing.
After securing both the glass and the case back, double-check for gaps or misalignment. This inspection ensures the integrity of the assembly and protects the internal mechanisms from dust and moisture.
Testing Functionality After Reassembly
Ensure the movement operates smoothly by manually winding it or using the stem. Observing the second hand should confirm that it ticks steadily without skipping or stuttering. Any irregularity signifies a misalignment within the mechanism.
Timekeeping Accuracy
Utilize a reliable time-measuring device to compare the time displayed with a known accurate source. Conduct this test over several hours or days to gauge precision. A deviation beyond a few seconds indicates adjustments may be necessary.
Additional Features Functionality
Test any complications like chronographs or date settings. Engage these features independently to verify proper operation. If problems arise, revisit the component assembly for potential issues.
Maintaining Your Timepiece Post-Assembly
Regularly clean the exterior with a microfiber cloth to avoid scratches and smudges. Use a soft brush to remove dust from crevices and around the crown. Avoid using harsh chemicals; opt for a gentle soap solution for more stubborn spots.
Checking Seals and Gaskets
Inspect the condition of seals and gaskets to ensure water resistance. Replace any worn or damaged components promptly, as this prevents moisture entry that can damage internal mechanisms.
Routine Servicing
Schedule periodic servicing every 3 to 5 years, depending on usage. This involves disassembling the movement, cleaning, and lubricating to maintain optimal performance. Keep an eye on mechanical rhythm; irregular ticking can indicate a need for adjustment.
FAQ:
What are the basic tools needed to reassemble a wristwatch?
To successfully put a wristwatch back together, you will need several essential tools. These typically include a case back opener (for removing and resealing the back of the watch), tweezers (for handling small parts without causing damage), a small screwdriver set (for screws on the movement), and a loupe or magnifying glass (to see small components clearly). Additionally, having a soft cloth or a watchmaker’s mat can help protect the watch and provide a stable surface while you work.
Can you explain the steps to reassemble a mechanical wristwatch?
Reassembling a mechanical wristwatch involves several key steps. First, ensure that all parts are clean and in good condition. Start by placing the movement into the watch case, making sure it aligns properly with the dial. Next, gently insert the hands onto the movement, taking care to position them accurately at the correct times. Then, attach the dial, ensuring it is secure before moving to the case back. Finally, carefully close the case back, ensuring it’s sealed tightly to protect the movement from dust and moisture. Attention to detail at each stage is crucial for the watch’s functionality.
What common mistakes should I avoid while putting a wristwatch back together?
One common mistake to avoid is losing small components, such as screws or springs, which can easily happen if you’re not organized. It’s best to work in a designated area with a clean surface. Another mistake is forcing components into place; this can lead to damage. Always ensure parts are aligned correctly before applying pressure. Lastly, skipping the cleaning process can adversely affect the watch’s performance, so it’s best to clean parts before reassembly to prevent dust and debris from causing issues later on.
How can I ensure that the watch is waterproof after reassembly?
To ensure that a wristwatch remains waterproof after reassembly, carefully check all seals and gaskets. Replace any worn or damaged gaskets to maintain the watertight integrity. When closing the case back, apply the correct amount of pressure without forcing it. It’s often helpful to perform a water resistance test after reassembly. This can be done using a water resistance tester or by submerging the watch in water for a brief period (if you are confident in the assembly). Always refer to the watch’s specifications for proper water resistance ratings.
What should I do if my wristwatch doesn’t work after reassembly?
If your wristwatch doesn’t work after reassembly, start by checking the battery (if it’s a quartz watch) to ensure it’s properly installed and functioning. If it’s a mechanical watch, inspect the movement for misaligned components, such as gears not seated correctly. Additionally, ensure that the hands are not obstructing each other or the dial. If you still experience issues, it may be wise to consult a professional watchmaker who has the expertise and tools necessary to troubleshoot and fix intricate problems that might not be easily visible.


