
 Ethan Cole

First, gather the necessary tools: a spring bar tool, a small screwdriver, and a clean cloth to avoid scratches. Position your accessory on a flat surface for stability. Identify the losing or malfunctioning link that needs to be addressed.
Utilize the pointed end of the spring bar tool to compress the spring bar nestled within the attachment of the band. Gently push and release the spring bar, allowing for the disengagement of the link. Carefully remove the link from the assembly.
Now, take your new link and align it with the existing segments, ensuring that the holes are correctly positioned for the spring bar. Insert the bar, compressing it again with the tool. Confirm that it securely locks into place by gently tugging on the link. Finally, conduct a visual inspection and a quick test to ensure everything is functioning properly.
Steps to Substitute a Fastener on Your Timepiece
Utilize a spring bar tool for safe removal. Insert the pointed end between the lugs to depress the bar’s ends, releasing the current fastener. It may require slight pressure to fully disengage.
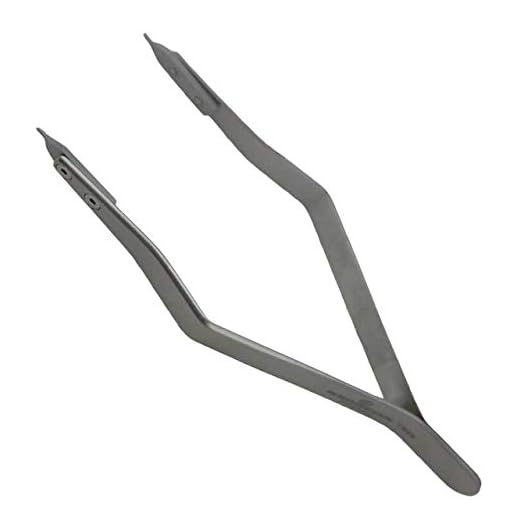

Inserting the New Connector
Align the new component with the holes on both ends in the watch case and strap. Compress the bar slightly and slide it into the lug holes. Ensure it clicks into place, providing a secure fit. Confirm that it is properly seated by gently tugging on the strap.
Final Check for Security
Inspect the attachment thoroughly before wearing. Wiggle the strap to verify stability. This step ensures that your accessory will remain securely on your wrist during daily use.
Identifying the Type of Pin Used in Your Timepiece
Begin with a thorough examination of the strap’s connections. Observe if there are any visible grooves or notches, as this can indicate the kind of fastening mechanism in place.
Common Types of Fastenings
- Tension Pins: Often found in metal bands, these are spring-loaded and can be released by pushing them inwards.
- Screw Pins: Require a small screwdriver for removal. Look for tiny screws on either side of the link.
- Collapsible Links: These feature a simple click mechanism, allowing easy disassembly.
- Spring Bars: Common in leather and fabric straps, they feature small springs that hold the strap in place. A specialized tool can help in their removal.
Tools for Identification
Use a magnifying glass or jeweler’s loupe to inspect the fastenings closely, aiding in determining the specific style used.
A small flashlight can also assist in illuminating hard-to-see areas, making it easier to identify what type of mechanism is present.
Lastly, take note of any manufacturer markings or model numbers found on the back of the case; this information can often lead to product-specific details and support options.
Gathering Necessary Tools for Pin Replacement
For a successful pin swap, gather the following items: a spring bar tool, a pair of tweezers, a small cloth or microfiber towel, and a magnifying glass. The spring bar tool is crucial for pushing in and pulling out the bars without damaging the strap or casing.
Tweezers assist in handling small components, minimizing the risk of losing parts. The cloth provides a clean surface, protecting against scratches and dirt during the process. A magnifying glass is helpful for inspecting small pieces and ensuring accuracy.
Consider a small container to store removed components securely, preventing loss. A second pair of hands may also be beneficial to hold the timepiece steady while you work.
Removing the Old Pin Safely
Begin by positioning the timepiece on a stable surface, preferably a soft cloth to prevent scratches. Use a spring bar tool or a similar implement to push the small rod inwards toward the center. This action should relieve the tension on the spring mechanism. Apply gentle pressure to the tool, ensuring a proper grip without slipping.
With one end of the component exposed, carefully lift it out from the strap or band. If resistance is encountered, double-check that the bar is fully compressed. Avoid yanking or forcing, as this may damage the attachment points.
Repeat the process for the opposite end once the initial side is removed. Keep a firm but gentle hold on the tool to maintain control throughout the operation. Once both ends are free, the linkage can be fully extracted from the band.
Inspect the component for any signs of wear or damage. If the new implementation requires a different style or size, taking a moment to ensure compatibility can save future issues.
Installing the New Pin Correctly
Align the new component with the holes in the strap and the casing. Ensure that it fits snugly without forcing it. A gentle push or a soft hammer tap may be required to seat it properly. Use a small piece of cloth to protect the surface from scratches during this process.
Securing the Component
Once the new element is in position, check that it is seated evenly on both sides. It should not be protruding or misaligned. If there’s resistance, assess the fitment and adjust as needed. Avoid excessive pressure as it can lead to damage.
Final Check
After installation, move the band to ensure smooth operation. Inspect both ends to confirm that everything is secure. This will help prevent any malfunctions or accidental disengagement during use.
Testing the Timepiece for Stability After Installation
After the fitting of the new component, ensure the integrity of the entire accessory by following these steps:
Visual Inspection
- Check for any misalignment or gaps between links.
- Look for signs of damage or improper installation around the inserted area.
Movement Assessment
- Gently apply pressure on the new section to feel for solid anchoring.
- Wearing the piece for a brief period will help determine comfort and functionality.
- Observe if there are any unusual sounds or movements during everyday activities.
If any concerns arise, reassess the fitting procedure or consult a professional for further evaluation.
Caring for Your Timepiece After Pin Installation
Ensure the longevity of your accessory by adhering to a regular cleaning routine. Use a soft, lint-free cloth to wipe the surface gently.
Keep the item away from extreme temperatures and humidity. Store it in a cool, dry place to prevent moisture buildup, which can damage internal components.
Inspect the connection frequently for any signs of wear or looseness. If any issues arise, consider revisiting the installation process or consulting a professional.
Be cautious around water; if your accessory is water-resistant, verify the sealing is intact. Avoid submerging it if unsure about its resistance level.
Set reminders for routine maintenance checks, ideally once a year, to evaluate the condition of mechanical parts and ensure proper functionality.
Refer to the manufacturer’s guidelines regarding care and recommended servicing intervals, adjusting your maintenance schedule according to their suggestions.
| Care Task | Frequency | Notes |
|---|---|---|
| Wipe down exterior | Weekly | Prevents dust accumulation |
| Check for loose components | Monthly | Catch issues early |
| Professional servicing | Annually | More thorough inspection |


