
 Ethan Cole

For a seamless transition to a new strap, gather the necessary tools: a spring bar tool, or in its absence, a small flathead screwdriver. Remove the old strap by gently pushing the spring bar inward to disengage it from the lugs. Apply consistent pressure to ensure the bar slides out without damaging the casing.
Once the previous strap is off, select a replacement that matches the watch’s specifications. Measure both the width of the lugs and the desired length for comfort. Insert the spring bars into the new strap, then align them carefully with the lugs. A firm press will secure the bars in place, ensuring a snug fit.
Check the alignment after the new strap is attached by rotating the watch and observing how it sits on the wrist. A proper installation means it should not wobble or feel loose. Before wearing it daily, perform a gentle tug test to confirm everything is securely fastened.
Identifying the Type of Watch Band You Need
Determine the width of the attachment area where the strap connects. Standard measurements usually include 18mm, 20mm, or 22mm. Use a caliper or ruler for precise assessment.

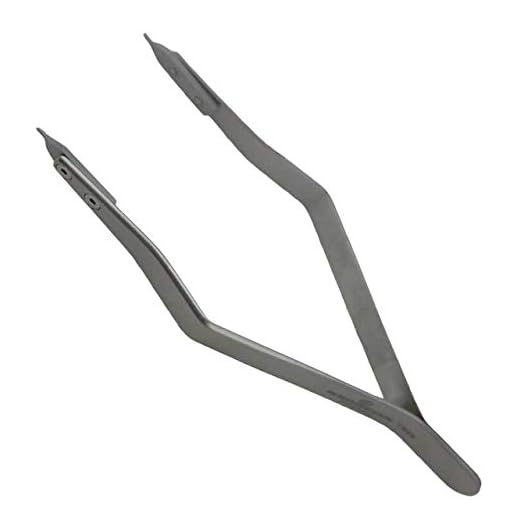
Identify the fastening mechanism. Common types include spring bars, quick-release pins, or screws. Familiarity with these mechanisms aids in selecting compatible replacements.
Consider the material preferences. Options vary from leather, stainless steel, silicone, to fabric. Choose based on intended use, durability, and comfort.
Examine the style of the timepiece. Casual, formal, or sporty aesthetics should align with the design of the new strap for cohesive visuals.
Investigate the existing model number or brand for specific compatibility recommendations. Manufacturer details often specify suitable accessories, reducing guesswork.
Tools Required for Watch Band Replacement
A spring bar tool is necessary for detaching the current strap and attaching a new one. This specialized instrument simplifies the process of releasing spring bars, which typically secure the band to the casing.
A small flathead screwdriver can assist in prying open the links of certain styles of bands, especially metal ones. This is particularly useful when adjusting the length or removing a section for better fit.
A pair of pliers, preferably with rubber grips, provides the needed leverage while ensuring delicate components remain unharmed during manipulation. Using pliers reduces the risk of damaging the watch casing or the new strap.
A soft cloth is recommended to protect the watch face and casing from scratches while working on the replacement. Laying the watch on a clean, soft surface prevents any accidental damage.
A magnifying glass or jeweler’s loupe can come in handy for examining small components and to ensure precise alignment during reassembly. This is beneficial for maintaining the integrity of the timepiece.
Lastly, a dedicated storage container for small parts–like screws or links–will help keep everything organized and reduce the likelihood of losing essential components during the process.
Removing the Old Watch Band Safely
Begin by placing the timepiece on a soft, clean surface to prevent scratches. Inspect the attachments to determine the mechanism for removal; common types include spring bars, screws, or quick-release levers.
Spring Bar Method
For models with spring bars:
- Utilize a spring bar tool to gently compress both ends of the bar, allowing the pin to slide out.
- Conduct this process on each side of the strap, ensuring both ends are secured before applying pressure.
- Be cautious of spring bar tension to prevent it from accidentally launching across the room.
Screw Type
For those with screws:
- Employ a precise screwdriver that fits snugly in the screw heads.
- Loosen the screws carefully, and place them in a small container to avoid misplacement.
- Remove the strap gently; excessive force may damage the lugs.
Once detached, check the watch’s lugs for any dirt or debris before attaching a new strap. Keeping the area clean will enhance the longevity of both the timepiece and the new accessory.
Choosing the right size for your new strap
Select the appropriate length to ensure comfort and security when wearing the timepiece. Most straps are available in standard lengths, typically ranging from 6 to 8 inches. Measure the wrist to determine the correct fit. Use a soft measuring tape or a piece of string to find the circumference just above the wrist bone. After measuring, add a half inch to one inch for optimal comfort.
Understanding width matching
The width of the strap must align with the lugs of the case, which is where the strap attaches. Standard widths vary from 18mm to 24mm. Measure the distance between the lugs or consult manufacturer specifications to identify the correct width. A snug fit minimizes movement and enhances aesthetics.
Material considerations
The choice of material affects both fit and comfort. Leather, metal, silicone, and fabric options all vary in thickness and flexibility. If opting for a metal variant, consider the clasp size as it may require additional links for a customized fit. For casual wear, flexible materials like silicone provide a comfortable and adjustable fit.
Attaching the new timepiece strap securely
Ensure a tight fit by aligning the new strap’s spring bars with the watch lugs. Compress the spring bar using a tool and slide it into place, ensuring it clicks distinctly. Visual confirmation of its secure placement is crucial, as a loose connection may lead to detachment.
Utilize a small flathead screwdriver for extra confirmation; gently press the spring bar toward the lugs if necessary. After securing both ends, perform a gentle tug test on the strap to verify stability.
After attaching, inspect the alignment of the strap, confirming it sits evenly across the case. Misalignment could affect both aesthetics and comfort. Adjust as needed by slightly loosening and repositioning the strap.
Finally, check for any additional features, such as quick-release mechanisms, to guarantee they function properly, allowing swift adjustments in the future.
| Step | Action |
|---|---|
| 1 | Align spring bars with lugs |
| 2 | Compress spring bar and slide into place |
| 3 | Use screwdriver for additional security |
| 4 | Perform tug test to check stability |
| 5 | Inspect and adjust alignment |
| 6 | Check quick-release mechanisms |
Tips for Maintaining Your New Strap
Regularly clean the new strap with a soft cloth to remove dust and skin oils. This prevents buildup that can degrade materials over time.
For leather options, apply a quality conditioner every few months to maintain suppleness and avoid cracking. Ensure it is designed for the specific type of leather.
Metallic types should be occasionally polished to remove tarnish and enhance the shine. Use a specialized polish appropriate for the metal’s finish.
Avoid exposing synthetic materials to extreme temperatures and direct sunlight, as these factors can lead to fading and deformation.
Check the attachment points frequently for signs of wear. If any part appears loose or damaged, address it immediately to prevent potential loss.
Store the timepiece in a protective case when not in use to keep it safe from scratches and environmental conditions that could harm the strap.
If applicable, rotate between different straps to reduce wear on a single one and to keep a fresh look.



