Ethan Cole
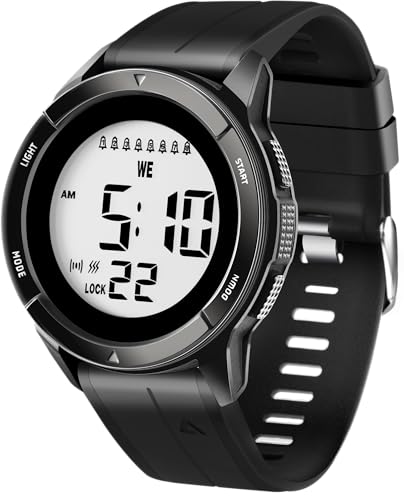
Access the settings menu on the device by pressing the designated button, typically located on the side. This action will reveal various options including time adjustment, alarm settings, and date configuration.
Focus on time adjustment first. Select the hour, minute, and sometimes seconds display. Utilize the increment buttons to reach the current time accurately. Once the correct hour and minute display, confirm the selection by pressing the same button used to enter the settings menu.
If the device features an AM/PM indicator, ensure the correct period is chosen, preventing any confusion regarding morning and evening timings. Next, navigate to the date settings–this usually involves selecting the appropriate month, day, and year using similar increment buttons.


Lastly, explore alarm functionalities. If alarms are part of the features, access this section to set the desired time for alerts. After configuration, always save changes to finalize the settings. The timepiece is now fully operational and will keep accurate records of time and date accordingly.
Setting Your Digital Timepiece
To adjust the time on your electronic accessory, locate the mode button. Press it until the display shows the time setting function.
Follow these steps for precise configuration:
- Press and hold the mode button until the seconds start flashing.
- Use the adjustment buttons to set the correct seconds, then press the mode button again.
- Adjust the minutes and hours in the same manner, confirming each selection with the mode button.
- If applicable, navigate to AM/PM settings for accurate time representation.
- Finish by accessing the date settings, adjusting day, month, and year consecutively.
- After final adjustments, exit the settings mode by pressing the mode button again.
Additional Tips
- Some models may require a specific sequence of button presses; refer to the manufacturer’s manual for guidance.
- Regularly check time accuracy, especially after prolonged use.
- For models equipped with alarm features, repeat similar procedures to establish alarms or timers.
Checking the Watch Type Before Setting
Identify whether the timepiece is a quartz or atomic model. This distinction is crucial for adjusting time accuracy. Quartz varieties typically need manual input for changes, while atomic variants may synchronize automatically with signal towers.
Refer to the user manual for specific instructions tailored to the model. Most brands provide detailed steps which can vary significantly between designs. Look out for specific buttons that are designated for programming modes and check for a reset function, which might clear previous settings.
Understanding Modes
Examine the display for mode indicators. Many watches offer different functionalities like alarm settings, timers, or even world time. Each function may require distinct adjustment processes, so knowing which mode is active helps in successful configuration.
Battery Check
Validate the battery life before attempting any modifications. Low battery power may hinder operational adjustments or lead to inaccurate timekeeping. If there’s any doubt, replace the battery before proceeding with settings.
In summary, verifying the timepiece type, consulting manuals, understanding available modes, and confirming battery condition are key actions before any adjustments. These steps ensure a smoother experience while altering the settings of the timepiece.
Understanding the Display Buttons and Functions
Familiarity with the buttons enhances the overall interaction with this timekeeping device. Typically, three to five buttons, often located on the sides, facilitate various operations. Their layout can differ based on the brand and model, so it’s advisable to consult the user manual for specific functions.
Primary Buttons
The main buttons usually include:
- Mode: Accesses different modes such as time, alarm, timer, and stopwatch.
- Adjust: Utilized for modifying time settings and other configurations.
- Start/Stop: Used for initiating or halting the timer or stopwatch functions.
- Light: Activates the backlight for visibility in low light conditions.
Functionality Overview
Upon entering a specific mode, pressing the Adjust button often allows changes to be made. For instance, while in time mode, pressing Adjust might enable minutes or hours to be altered. Remember, functionalities can vary by model; hence, knowing the distinct features of the particular model is beneficial. Regular practice with these buttons also aids in fluid movement between different settings, minimizing confusion during adjustments.
Adjusting the Time and Date Correctly
To accurately modify the time and date, locate the mode button, usually labeled “Mode” or an equivalent. Press this button until the time display begins to blink.
Next, utilize the adjustment buttons–often marked with “+” and “-” or arrows. Start by setting the hour: when the hour flashes, use the adjustment buttons to define the correct hour. If a 24-hour format is being used, ensure correct distinction between AM and PM.
Proceed to the minutes, which will start to blink after setting the hour. Adjust them similarly using the buttons. Once the minutes are correct, move to the date settings by pressing the mode button again.
Set the month first, followed by the day. Pay attention to the maximum days of the month to avoid discrepancies, particularly in February. After all adjustments, confirm by pressing the mode button one last time.
Finally, verify that the settings are correct by returning to the main display. A quick glance at the display should confirm that both the time and date are set accurately. If discrepancies arise, repeat the process as necessary.
Setting Alarms and Timers on Your Timepiece
Access the alarm or timer mode using the designated button. This is often labeled as “Alarm,” “Timer,” or a similar term. Hold down the button until the display flashes to indicate entry into the setting mode.
To configure an alarm, navigate to the hour section. Use increment and decrement buttons to adjust the hour. APM setting is usually toggled by pressing a specific button once the hour is set. Proceed to the minutes and adjust in the same manner.
Confirm the settings by pressing the same button used to enter the alarm mode. An indicator may appear, confirming that the alarm is activated. For timers, set the desired countdown duration by adjusting hours and minutes similarly. Initiate the timer by pressing the start button.
If multiple alarms or timers can be programmed, repeat this process for each. To deactivate an alarm, return to the alarm setting and disable it, often by pressing the same activation button again. Timers can usually be stopped or reset using a dedicated stop or reset button.
To easily distinguish between multiple alarms, consider setting distinctive times or using different alerts if that feature is available. Review your timepiece manual for any specific functions or additional features that may enhance alarm and timer settings.
Synchronizing with Your Smartphone or Computer
Connect a timepiece with a mobile device or computer for accuracy. Most modern timepieces offer Bluetooth functionality, enabling seamless synchronization. Begin by ensuring the corresponding app is installed on your smartphone.
Follow these steps for successful pairing:
| Step | Description |
|---|---|
| 1 | Open the app and turn on Bluetooth on your mobile device. |
| 2 | Activate pairing mode on the timepiece, usually done by holding a specific button until a prompt appears. |
| 3 | Select the name of the timepiece from the list of available devices in the app. |
| 4 | Confirm the connection, which may involve entering a code displayed on the screen. |
Once synchronized, the settings like time, date, and alarms auto-update according to the device’s time zone. This ensures precision and saves time adjusting manually.
For software or firmware updates, access the settings within the app, which can significantly improve functionality and features. Regular updates also help maintain security and performance.
If experiencing issues, restart both the timepiece and mobile device, then attempt reconnection. Refer to the user manual for specific troubleshooting tips related to the model.