
 Ethan Cole

Use a small spring bar tool to push in on the bar at the lugs to release tension. This method ensures safety for both the timepiece and the strap during the process.
Examine the attachment points closely. Identify if the strap is secured by a spring bar mechanism; some models have pins that need to be removed with pliers. Always maintain a steady hand to avoid damaging the casing.
Place a cloth on a flat surface to prevent scratches. Carefully slide the tool between the strap and the casing to assist in detaching the pins. Remember, working in a well-lit area will help ensure accuracy without losing small components.
Once detached, store the strap and all parts securely to avoid misplacement. If you plan to replace or customize the strap, make sure to select the right size and fitting for hassle-free reattachment.
Instructions for Detaching Your Timepiece Strap
Utilize a small flathead screwdriver or a spring bar tool for this task. Locate the spring bar at the point of attachment between the clasp and your timepiece’s case. Carefully insert the tool into the gap where the spring bar sits.
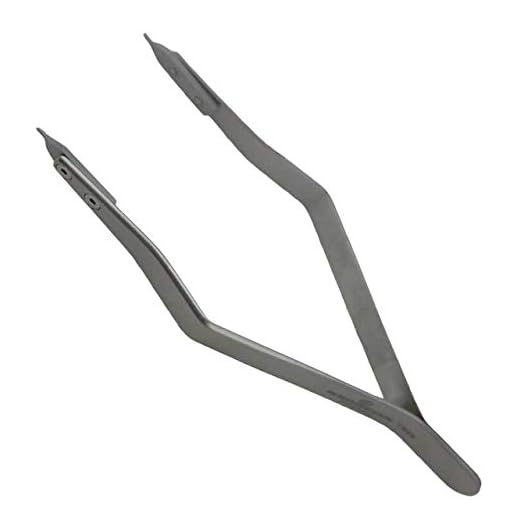

Apply gentle pressure to compress the spring bar. This action will release the bar from its housing. While doing this, pull the strap away from the case to free it completely.
If your model features removable links, look for pins on each link. Use pliers to push these pins out, releasing the strap segment. Ensure you maintain a steady hand to prevent damage to the links.
For models with solid-end links, check for screws securing the attachment. Use the appropriate screwdriver to unscrew and detach the strap. Keep all components together to avoid misplacement.
Finalize by carefully inspecting the lug and strap for any debris or dirt. Clean the components before attaching a new strap for improved longevity and functionality.
Identifying Your Casio Watch Model
Locate the model number on the timepiece, typically found on the back case or where the strap attaches. This identifier can be crucial in determining the appropriate method for changing the strap.
Common Locations for Model Numbers
- Back of the case: Inspect the rear side for engravings or printed text.
- Between the lugs: Check between the attachment points of the strap.
- Original packaging: If you still have the box, the model number is often listed on the label.
Using the Model Number
Once you have obtained the model number, consult the official Casio website or authorized service centers for details specific to your timepiece. You can find manuals, strap replacement guides, and recommended accessories based on your model.
If you’re still uncertain, consider reaching out to watch enthusiast communities online. Experienced users can provide insights and recommendations tailored to your specific model.
Gathering Necessary Tools for Band Removal
Prepare a spring bar tool or a similar implement designed for disengaging pins in the clasp. This is often available at jewelry supply stores or online. A micro screwdriver set can assist in adjusting the screws if your accessory has a screw-type fastening.
Additionally, have a soft cloth or microfiber cloth handy to protect the surface and avoid scratches during the process. A dedicated work surface, like a table or countertop, is advisable to prevent small parts from getting lost. For extra precision, consider using tweezers, which provide enhanced grip for manipulating tiny components involved in the clasp mechanism.
If required, a plastic pry tool may assist in separating parts without damaging the finish. Finally, ensure good lighting in your workspace to accurately see the mechanisms as you work on the piece.
Understanding the Band Attachment Mechanism
The attachment mechanism varies among different models of timepieces. Most often, there are two primary types: spring bars and quick-release pins. Familiarizing oneself with these systems will streamline the detachment process.
Spring Bars
Spring bars are cylindrical metal rods with two ends that feature small notches. These notches allow the bars to fit securely within the lugs of the timepiece. To disconnect this setup, a tool is needed to compress the bar, releasing it from the lug and allowing for easy removal of the strap. Ensuring a steady hand while applying gentle pressure is key to avoid damaging the bar or the timepiece.
Quick-Release Pins
Quick-release pins simplify the process significantly. These mechanisms include a lever on the back of the strap that, when pressed, withdraws the pin from the lug. Activating this lever engages the release, making it possible to swap the strap effortlessly. For models equipped with quick-release mechanisms, attention should be paid to the direction in which the lever is pressed and the corresponding movement required to detach the strap without friction.
Step-by-Step Guide to Remove Metal Bands
Prepare your workspace by securing it on a flat surface. This helps prevent any small components from getting lost.
Identify the type of pins used to connect the link pieces. Most metal bands utilize either spring bars or friction pins. If spring bars are present, a tool with a forked end will simplify their extraction.
Start with one end of the strap. If using spring bars, gently compress the bar with your forked tool and slide it out of the lug. If friction pins are in use, locate the small holes on either side of the link, insert a small pin pusher, and push the pin out with steady pressure.
Once detached from the casing, examine the connection points. For resizing, determine how many links need removal. Ensure to maintain balance by removing an equal number of links from both sides if applicable.
To remove links, continue pushing out the pins holding the links together. Once the desired number of links is separated, reattach the remaining links using the pins. Align the small holes and drive the pins back in until flush with the surface.
| Step | Description |
|---|---|
| 1 | Secure your workspace on a flat surface. |
| 2 | Identify pin type: spring bars or friction pins. |
| 3 | Compress and slide out pins using the appropriate tool. |
| 4 | Decide on the number of links to detach. |
| 5 | Push out pins connecting the links you wish to remove. |
| 6 | Reattach remaining links using the pins. |
Check the integrity of the connections before wearing. Ensure all links are secure, preventing any accidental detachments during use.
Step-by-Step Guide to Remove Resin Bands
To detach a resin strap, first locate the spring bar on either end of the piece. Use a spring bar tool or a small flathead screwdriver to apply gentle pressure on the bar’s end. This action will compress the bar, allowing it to slide out of the lug. Be cautious to keep the tool away from the surface of the housing to avoid scratches.
1. Set Your Workspace: Ensure a clean, flat surface. Using a soft cloth will help prevent damage.
2. Position the Timepiece: Lay the item face down, exposing the back to access the attachments easily.
3. Identify the Spring Bar: Look closely at the area where the strap connects. The spring bar is visible and will typically have two ends protruding from the strap.
4. Compress the Spring Bar: Insert the forked end of the tool into the small slot of the spring bar. Press inward to compress and push the bar away from the lug hole.
5. Slide Out the Strap: Once the bar is compressed, gently pull the strap away from the housing. Repeat the same process for the opposite side.
6. Inspect for Damage: After detaching, examine the components for any signs of wear or damage that may need attention before attaching a new strap.
Following these steps will effectively detach a resin strap without damaging your timepiece. Always handle the components with care to maintain their integrity.
Reattaching or Replacing the Watch Band
To successfully attach a new or original strap, align the spring bars with the lugs on the case. Look for a slight indentation on the lugs where the bars will fit. Ensure the ends of the spring bars are inserted securely into these indentations.
Here are the steps to follow for a proper attachment:
- Position the flexible ends of the spring bar against the lug opening.
- Press the spring bar down using a tool to compress it, allowing it to slide into place.
- Listen for a click, indicating a secure fit, and verify the stability by slightly tugging on the strap.
Replacing a Damaged Strap
If the existing strap is worn or damaged, choosing a replacement is straightforward with these guidelines:
- Select a strap compatible with your model specifications.
- Consider the material; options include leather, metal, and synthetic materials.
- Ensure the width matches the original attachment point to avoid gaps.
- Follow the same attachment procedure as above to secure the new strap.
Once the strap is reattached correctly, assess the fit on your wrist for comfort. Adjust as necessary, either by resizing or choosing different holes, if applicable. Regularly check the attachments to ensure safety and functionality.


